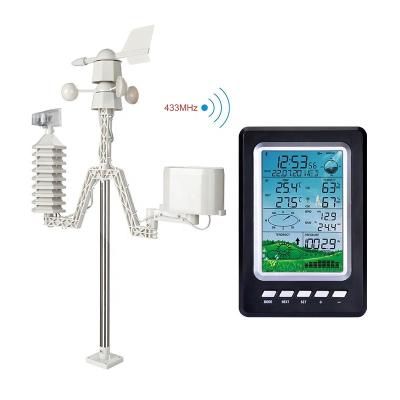
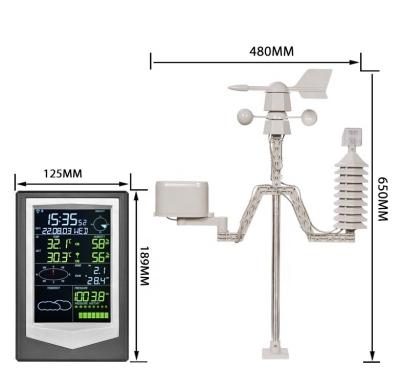
Wireless Weather Station Highly Integrated Low Power Consumption Fast Installation
Contents
Function Introduction
Technical Parameters
On-screen instructions
Button description
Button settings
Assembly instructions
Steps for using the product
Precautions
Technical Parameters
A>Parameters of indoor unit.
1.Perpetual Calendar: Display Format: Year, Month, Day YY-MM-DD .2.Clock display: Time display format: 24-hour format.3. Temperature range: 0°C~60°C(32°F~140°F), resolution: 0.1°C, accuracy: ±1°C.4. Humidity range: 20%~99%, resolution: 1%, accuracy: ±5%.5. Air pressure range: 600~1100hpa, resolution: 0.1 hpa, accuracy: ±3 hpa.6. Alarm clock: The clock flashes and the sound lasts for 1 minute.7. Dry battery power supply: alkaline dry battery 3×LR6AA1.5V voltage.8. Battery life: about 2~4 months, please use external power supply when the backlight is often used to light up.9. Power supply: USB data cable or power supply can be DC 5V .10. Low voltage detection: icon flashes to indicate battery replacement.
B>Parameters of outdoor unit
1. Temperature range: -40°C~60°C(-40°F~140°F), resolution: 0.1°C, accuracy: ±1°C.
2. Humidity range: 20%~99%, Resolution: 1%, Accuracy: ±5%.
3. Wind speed range: 0~50m/s, resolution: 0.1 m/s, accuracy: 1 m/s.
4. Wind direction: The wind direction is displayed in eight directions: E, S, W, N, SE, NE, SW, NW.
5. Rainfall range: 0~9999mm, rainfall resolution: 0.4mm.
6. Data transmission: data transmission frequency is once every 40 seconds.
7. Transmission mode: wireless 433MHz transmission, effective within 100 meters of transmission distance, (in the case of no obstruction and no interference).
8. Dry battery power supply: alkaline dry battery 2×LR6AA1.5V voltage.
9. Battery life: 4~6 months.
10. Low voltage detection: the icon flashes to prompt the battery to be replaced.
11. Waterproof Grade: Waterproof Level 3.
On-screen instructions
The LCD full display of this unit, after the user loads the battery, all the icons will be displayed for two seconds.
A1.A2 . The option does not have this function
A3. Alarm clock symbol, the user sets the alarm clock, and the alarm clock symbol will display the current one.
A4. The clock, the user can manually press the button to set,
A5. Perpetual calendar, users can manually press the button to set the perpetual calendar,
A6. Indoor temperature display, user can customize the setting unit, (°C/°F).
A7. Alarm display, users can customize the high alarm and low alarm.
A8. Outdoor temperature display, user can customize the setting unit, (°C/°F).
A9. Alarm display, users can customize high alarm and low alarm.
A10. Wind direction display, E, S, W, N, SE, NE, SW, NW eight directions.
A11. The cloud map shows that the climate change shows that it is cloudy, sunny, rainy, cloudy, and the trend changes.
A12. USB symbol, this product is connected to the computer through a USB data cable, that is, the USB symbol is displayed.
A13. Data storage display, the data storage status of the machine is displayed.
A14. Day of the week display, users can manually press the button to set.
A15. Humidity display, indoor humidity display, humidity high and low alarm can be customized.
A16. Humidity display, outdoor humidity display, humidity high and low alarm can be customized.
A17. Rainfall display, can be customized to set the unit, mm, inch, rainfall high and low alarm.
A18. Wind speed display, can be customized to set units, m/s, km/h, mph, knots, bft, wind speed alarm.
A19. Barometric pressure display, customizable setting unit, hPa, inHg, mmHg, high and low air pressure alarm.
A20. Barometric pressure histogram, customizable setting, 12-hour or 24-hour barometric pressure histogram.
Button description
B1. Battery cover, battery compartment location.
B2. MODE function button, press and hold the MODE button for 3S seconds, and enter the setting mode when the time flashes, providing users with various function settings.
B3. NEXT button, in setup mode, short press the NEXT button to select a single function to repeat the cycle, providing user settings.
B4. + key, in setup mode, short press the + key to select data increment.
B5: - key, in setup mode, short press - key to select data decrement.
B6. SET/HISTORY key setting: After setting the alarm value in the alarm clock or high and low alarm mode, the user needs to short press the SET/HISTORY button, and the alarm symbol will be displayed on the screen to take effect, and the SET/HISTORY button can also be short-pressed to cancel the alarm clock symbol in this mode.
B6. SET/HISTORY button to check historical data: In normal working mode, press and hold the SET/HISTORY button for 3 seconds
The historical data in the upper right circle flashes and has entered the historical data mode, short press the ( - / + ) button to view the historical data.
B7. LIGHT touch key: short touch once can light up the backlight after 36 seconds of automatic extinguishing, long press for 3 seconds to listen to the backlight is always on, cancel the continuous light long press for 3 seconds to drop a sound, 36 seconds after the extinguishment. (It is not recommended to set steady on for battery power) .
WS3030 The option does not have this function,LIGHT touch key.
B8. USB data port: connect to PC software through USB data cable to read the historical data stored by the product.
The user can power the product via a USB cable.
B9. DC: DC port users can use DC5V power supply to supply power to the product.
B10. Bracket: The product is placed on the support frame.
Button settings
1.>Clock setting: In boot mode, press and hold the (MODE) button for 3S seconds, at this time, you can see the screen clock number flashing, indicating that you have entered the clock setting mode, short press the (+/-) button to set the clock time, short press the (NEXT) button to enter the minute, short press the (+/-) button to set the minute, after the clock is set up, press and hold the (MODE) button for 3S seconds to save and exit to complete the setting.2.>Time zone setting: time difference can be set, in boot mode, long press (MODE) button for 3S seconds, at this time you see the screen clock digital flashing, indicating that you have entered the clock setting mode, every short press (NEXT) once to enter the minute, time zone, time zone default 08, short press (+ / -) key to set the time zone, after the time zone is set up, long press (MODE) button for 3S seconds to save and exit to complete the setting.3.>Alarm setting and cancellation: In boot mode, press and hold the (MODE) button for 3S seconds at this time, you can see the screen clock digital flashing, indicating that you have entered the clock setting mode, each short press (NEXT) button corresponds to the minute, time zone, alarm clock, clock, select the clock and minute to set the alarm clock, short press the (+ / -) button to complete the setting, the alarm clock needs to short press the (SET/HISTORY) button to see the alarm clock symbol, the alarm clock symbol setting takes effect, and the alarm clock symbol can also be canceled in this mode. If the alarm clock fails, press and hold the (MODE) button for 3S seconds to save and exit to complete the setting.4.>Date setting: In boot mode, press and hold the (MODE) button for 3S seconds, at this time, you can see the screen clock number flashing, indicating that you have entered the setting mode, and then short press the (MODE) button once the date flashes and enters the date setting mode, each short press (NEXT) corresponds to the year, month and day to be set, short press the (+/-) button to complete the setting, and press and hold the (MODE) button for 3S seconds to save and exit to complete the setting.5.>Temperature alarm and unit setting: In the boot mode, press and hold the (MODE) button for 3S seconds, and see the screen clock digital flashing at this time, indicating that it has entered the setting mode; each short press (MODE) button will switch to date flashing --- temperature flashing, corresponding to the flashing temperature, each short press (NEXT) button to switch between temperature high alarm--- temperature low alarm--- temperature maximum display --- temperature minimum display --- temperature unit switching.Corresponding selection settings such as: high alarm --- low alarm --- unit (°C / °F), short press (+ / -) button to complete the setting, alarm needs to short press (SET/HISTORY) key to see the alarm clock symbol, display the alarm clock symbol setting takes effect, in this mode can also cancel the alarm symbol, alarm invalid, long press (MODE) button for 3S seconds to save and exit to complete the setting.
Assembly instructions
1.Product installation: open the box, take out the product accessories, accessories package;Load the semi-circle of the wind speed standard in the direction of the semi-circle of the column, and lock the screws (see Figure A after installation);(The screws have been pre-locked at the factory, and the spare parts PA2.3*8mm are pre-provided in the accessory package);
a. Product power supply: first install (indoor unit) battery or USB power supply, and then install (outdoor unit) battery;
b. Product connection: the indoor unit starts to search for signals, and the connection is successful within 3 minutes, and the indoor machine will display the temperature and humidity of the outdoor unit;If the search fails, press any key of the indoor unit to start the search (or power off and restart the power)
c. PC connection: (according to the 9 PC operation guidelines);
d. Normal performance: that is, it can be installed and used as a fixed outdoor unit;
6. Product installation and fixation:
a. There are N and arrow indication on the product shell, which corresponds to the positive direction of N installation during installation;
b. The upper shell of the solar panel has the word S, and the installation is in the positive direction of S, so that the solar energy can convert electrical energy more effectively;
c. Base mounting, can be fixed at the bottom or side, 4 screws KA4.0*40mm;
d. Base fixation: check the balance of the level;
Steps for using the product(Sequential Steps)
1.>Open the package, take out the product and accessories, and assemble the outdoor unit accessories, (according to the sixth content, the assembly instructions are completed).
2. Install the indoor unit battery or USB power supply, and then install the outdoor unit battery.
3. The indoor unit starts to search for the signal, and the connection is successful within 3 minutes, and the indoor machine will display the temperature and humidity of the outdoor unit.
5. When there is an abnormality in the product test, repeat the operation according to the content of the manual, or see the tenth note.
6. If the test performance of the product is normal, it can be installed and fixed.
a. The indoor function can receive the data of the outdoor unit, and the product receives it normally.